Mail Merge from Excel to Word?
Mail Merge can be a real time-saver when it comes to sending mass mailings. It lets you quickly create custom letters, emails or mailing labels in Word by merging the information you already have in your Excel sheet. This tutorial provides an overview of the main features and explains how to do a mail merge from Excel step-by-step.
How Mail Merge Works
To get a grasp of the basics, you can think of it in terms of 3 documents. Excel source file with information about the recipients such as names, phone, addresses, emails, etc. Word document with codes for the personalized fields. The final Word document with personalized letters, emails, labels, or envelopes.
The goal of the mail merge is to combine the data in File 1 and File 2 to create File 3.
Preparing Excel spreadsheet for mail merge
When you run a mail merge, your Excel file will get connected to your Word document, and Microsoft Word will be pulling the recipient details directly from the connected worksheet.
Before running a mail merge in Word, make sure your Excel file has all the information you want to include such as first name, last name, Phone, Address, zip codes, etc. If you want to add more details, you'd better do this before starting the merge.
Here's an example of an Excel sheet that can be used for a mail merge

Once the source data spreadsheet is set and reviewed, you are ready to run the mail merge. In this example, we will be merging letters. For email messages, the steps will be essentially the same.
Step: 1
Choose what kind of merge you want to run. On the Mailings tab, in the Start Mail Merge group, click Start Mail Merge and pick the mail merge type - letters, email messages, labels, envelopes or documents. We are choosing Labels.

Step: 2
Select the recipients. On the Mailings tab, in the Start Mail Merge group, click Select Recipients > Use Existing List.

Step: 3
Select the source file of the sheet click on sheet name the press the ok button.
Step: 4
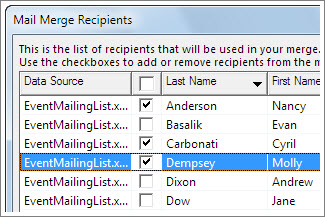
Refine the recipient list. If you want to exclude certain recipients, then click the Edit Recipient List button in the Start Mail Merge group.


Step: 5
Insert merge fields click the Insert Merge Field button on the ribbon, and choose the field from the drop-down list.
Step: 6
Click on the preview result and it will show the full details of merging fields.
Step: 7
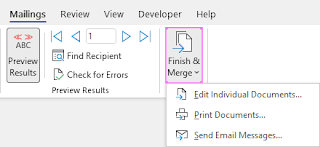
If you are happy with all the previews, head over to the Finish group and click the Finish & Merge button. Here you can choose to print the letters or send them as email messages. To make some edits before printing or emailing, click Edit Individual Documents. A new document will open, and you will be able to make the changes in each particular letter.


Hopefully, this information has been helpful, and now you know how to perform mail merge from Excel to Word correctly.
Thank you for reading!


Comments
Post a Comment